一. 前言
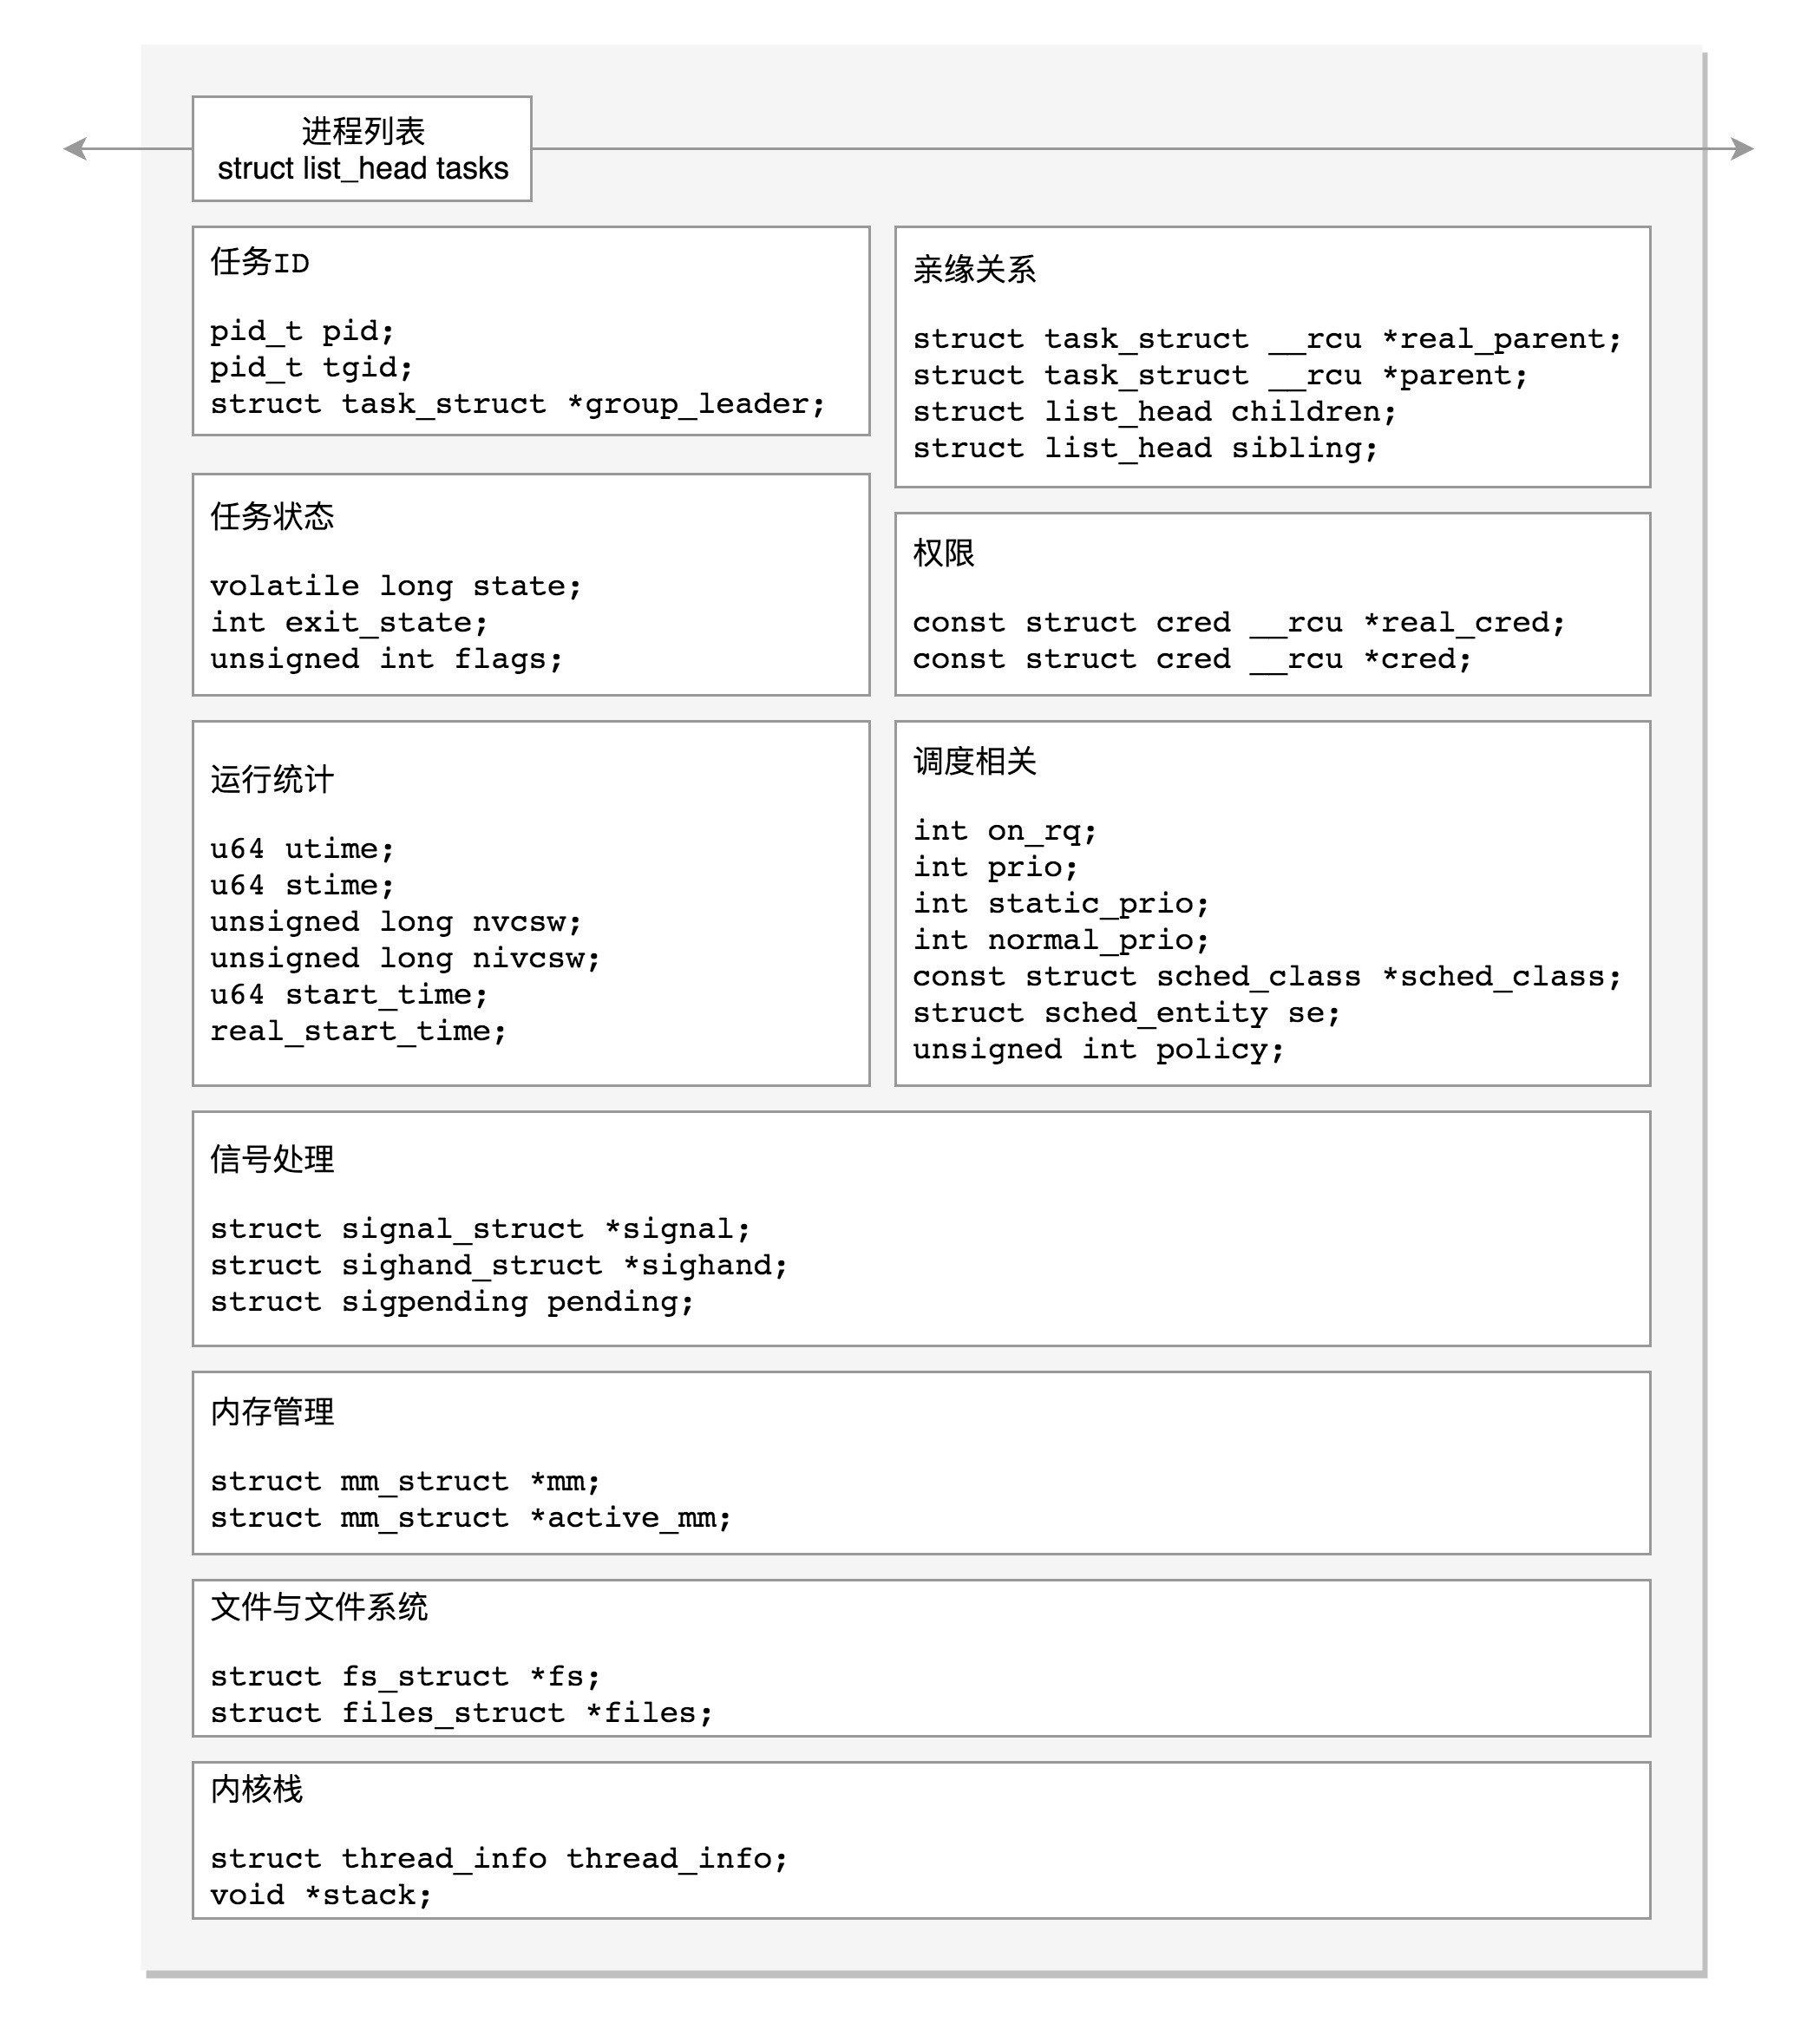
在前文中,我们分析了内核启动的整个过程以及系统调用的过程,从本文开始我们会介绍Linux系统各个重要的组成部分。这一切就从进程和线程开始,在 Linux 里面,无论是进程,还是线程,到了内核里面,我们统一都叫任务(Task),由一个统一的结构 task_struct 进行管理。这个结构非常复杂,本文将细细分析task_struct结构。主要分析顺序会按照该架构体中的成员变量和函数的作用进行分类,主要包括:
- 任务ID
- 亲缘关系
- 任务状态
- 任务权限
- 运行统计
- 进程调度
- 信号处理
- 内存管理
- 文件与文件系统
- 内核栈
二. 详细介绍
2.1 任务ID
任务ID是任务的唯一标识,在tast_struct中,主要涉及以下几个ID
1 | pid_t pid; |
之所以有pid(process id),tgid(thread group ID)以及group_leader,是因为线程和进程在内核中是统一管理,视为相同的任务(task)。
任何一个进程,如果只有主线程,那 pid 和tgid相同,group_leader 指向自己。但是,如果一个进程创建了其他线程,那就会有所变化了。线程有自己的pid,tgid 就是进程的主线程的 pid,group_leader 指向的进程的主线程。因此根据pid和tgid是否相等我们可以判断该任务是进程还是线程。
2.2 亲缘关系
除了0号进程以外,其他进程都是有父进程的。全部进程其实就是一颗进程树,相关成员变量如下所示
1 | struct task_struct __rcu *real_parent; /* real parent process */ |
parent指向其父进程。当它终止时,必须向它的父进程发送信号。children指向子进程链表的头部。链表中的所有元素都是它的子进程。sibling用于把当前进程插入到兄弟链表中。
通常情况下,real_parent 和 parent 是一样的,但是也会有另外的情况存在。例如,bash 创建一个进程,那进程的 parent 和 real_parent 就都是 bash。如果在 bash 上使用 GDB 来 debug 一个进程,这个时候 GDB 是 parent,bash 是这个进程的 real_parent。
2.3 任务状态
任务状态部分主要涉及以下变量
1 | volatile long state; /* -1 unrunnable, 0 runnable, >0 stopped */ |
其中状态state通过设置比特位的方式来赋值,具体值在include/linux/sched.h中定义
1 | /* Used in tsk->state: */ |
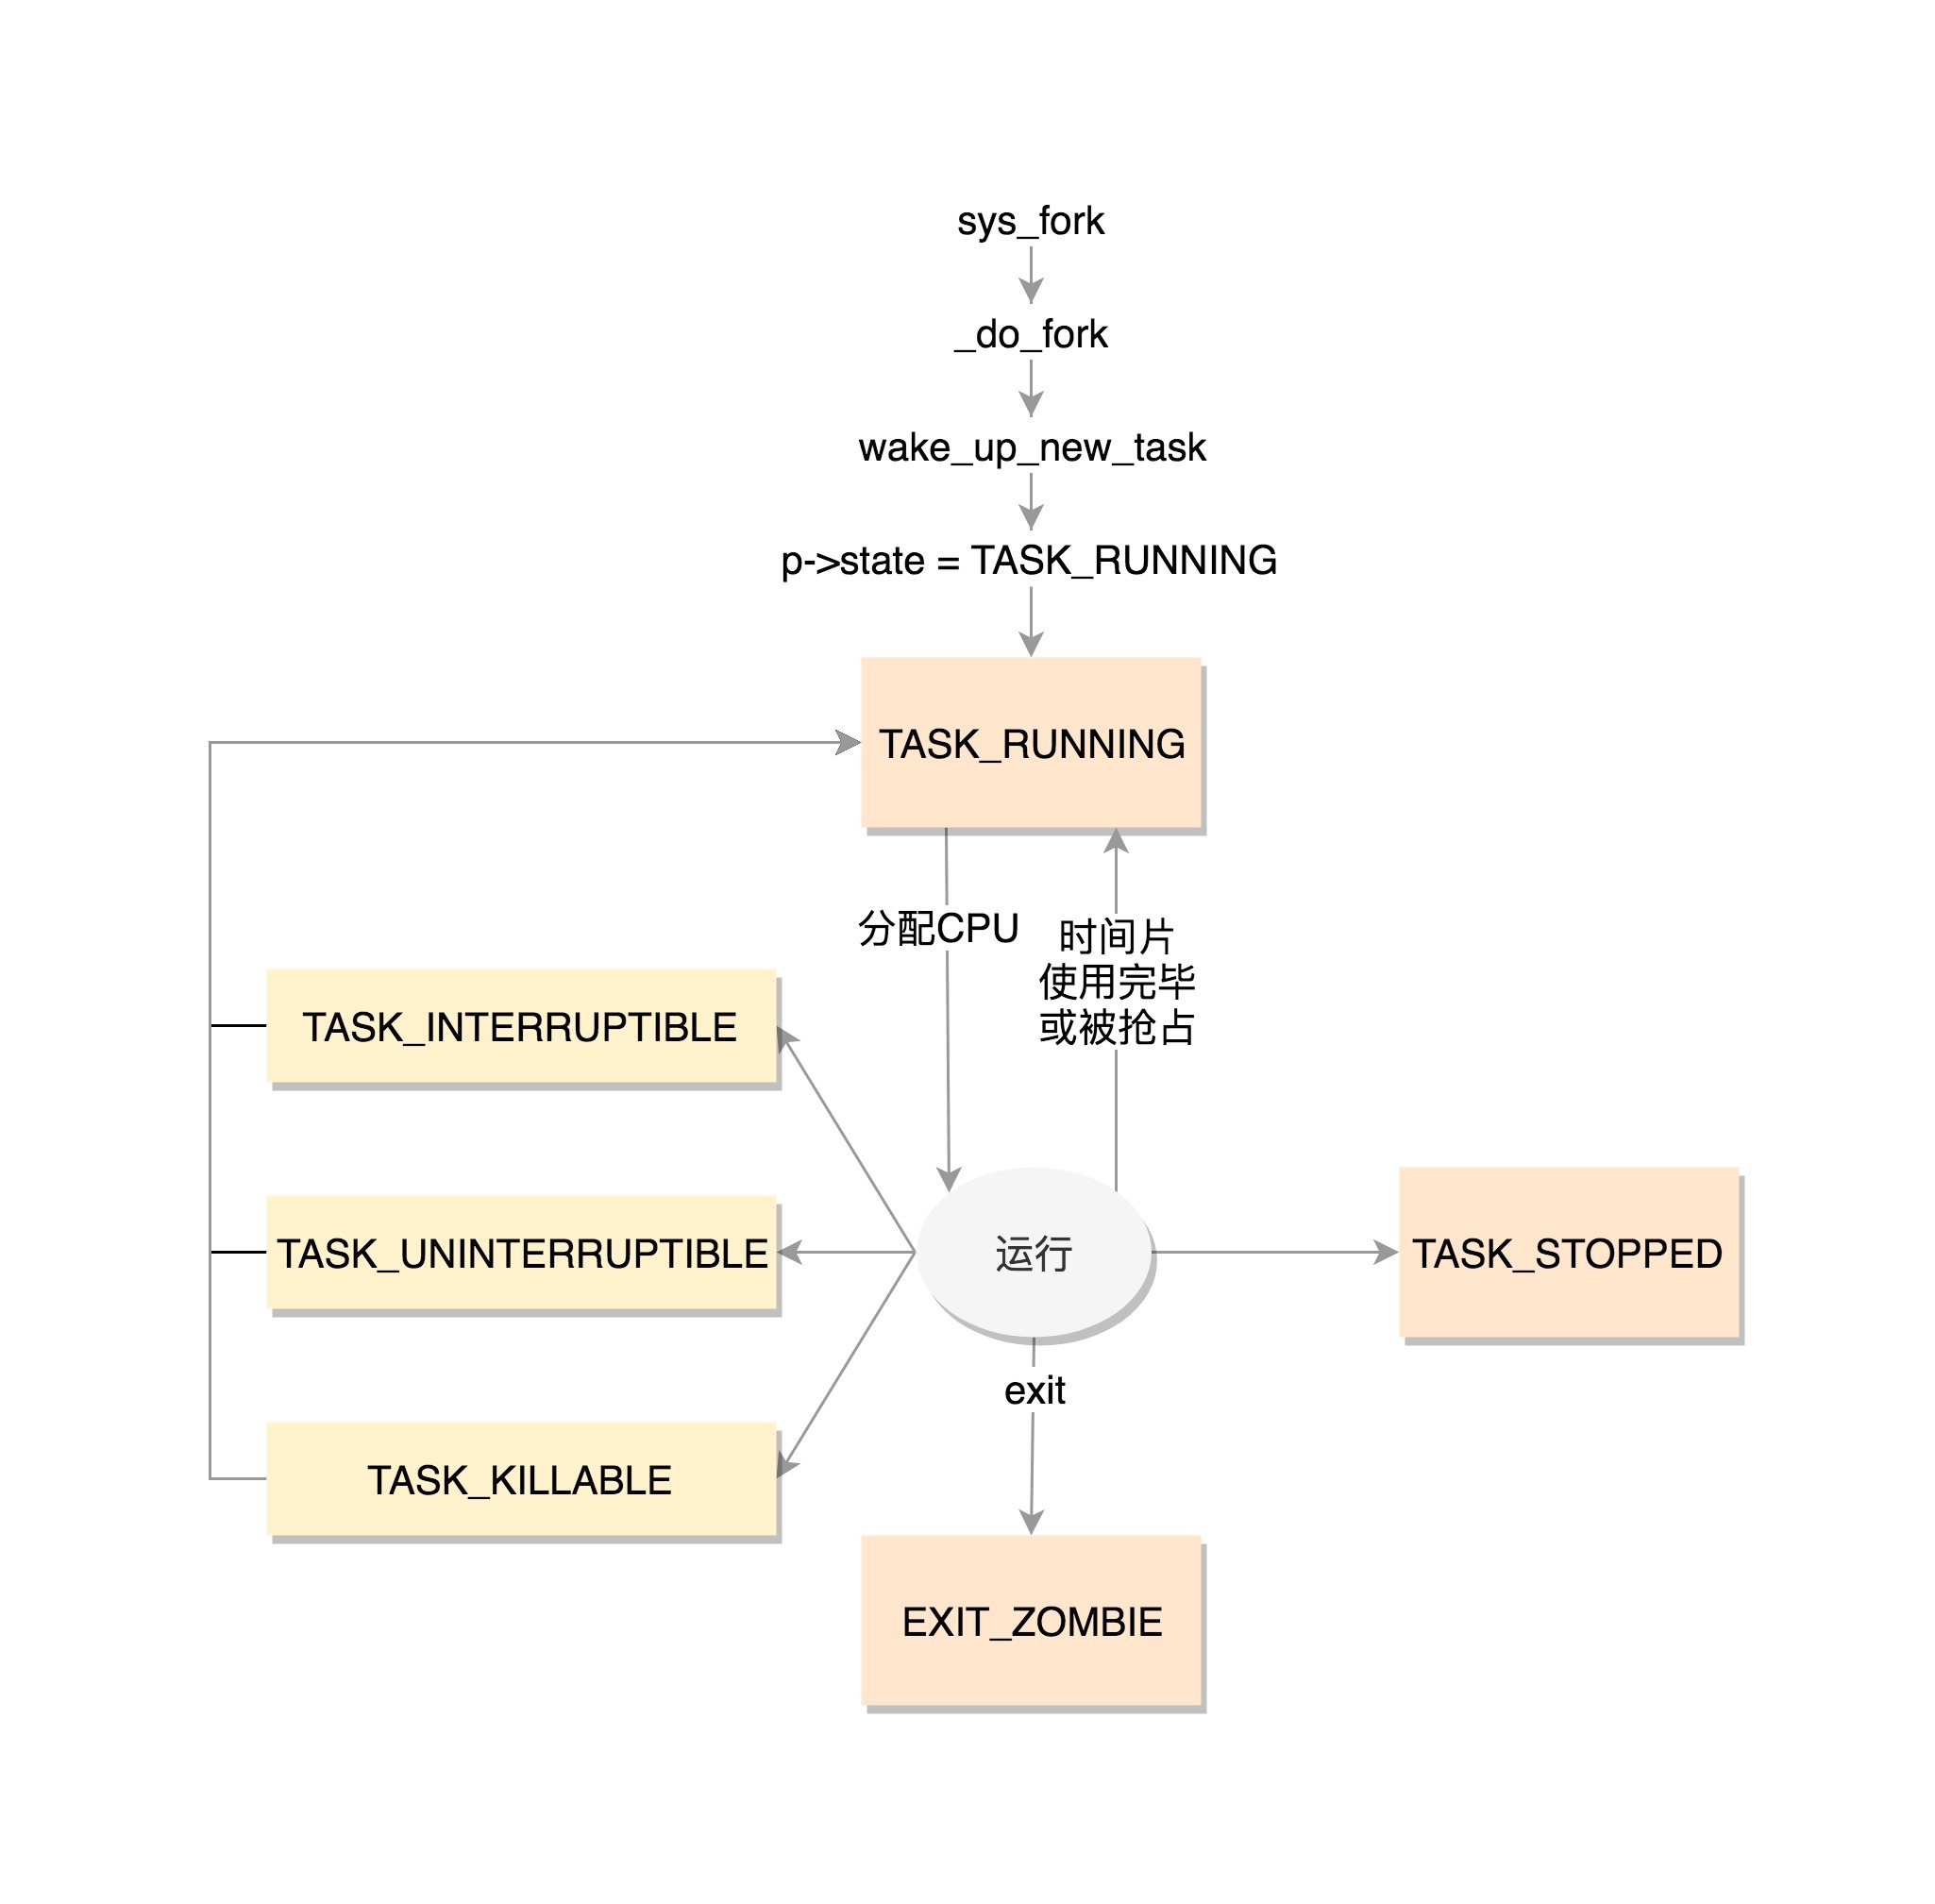
TASK_RUNNING并不是说进程正在运行,而是表示进程在时刻准备运行的状态。当处于这个状态的进程获得时间片的时候,就是在运行中;如果没有获得时间片,就说明它被其他进程抢占了,在等待再次分配时间片。在运行中的进程,一旦要进行一些 I/O 操作,需要等待 I/O 完毕,这个时候会释放 CPU,进入睡眠状态。
在 Linux 中,有两种睡眠状态。
- 一种是
TASK_INTERRUPTIBLE,可中断的睡眠状态。这是一种浅睡眠的状态,也就是说,虽然在睡眠,等待 I/O 完成,但是这个时候一个信号来的时候,进程还是要被唤醒。只不过唤醒后,不是继续刚才的操作,而是进行信号处理。当然程序员可以根据自己的意愿,来写信号处理函数,例如收到某些信号,就放弃等待这个 I/O 操作完成,直接退出;或者收到某些信息,继续等待。 - 另一种睡眠是
TASK_UNINTERRUPTIBLE,不可中断的睡眠状态。这是一种深度睡眠状态,不可被信号唤醒,只能死等 I/O 操作完成。一旦 I/O 操作因为特殊原因不能完成,这个时候,谁也叫不醒这个进程了。你可能会说,我 kill 它呢?别忘了,kill 本身也是一个信号,既然这个状态不可被信号唤醒,kill 信号也被忽略了。除非重启电脑,没有其他办法。因此,这其实是一个比较危险的事情,除非程序员极其有把握,不然还是不要设置成TASK_UNINTERRUPTIBLE。 - 于是,我们就有了一种新的进程睡眠状态,
TASK_KILLABLE,可以终止的新睡眠状态。进程处于这种状态中,它的运行原理类似TASK_UNINTERRUPTIBLE,只不过可以响应致命信号。由于TASK_WAKEKILL用于在接收到致命信号时唤醒进程,因此TASK_KILLABLE即在TASK_UNINTERUPTIBLE的基础上增加一个TASK_WAKEKILL标记位即可。
TASK_STOPPED是在进程接收到 SIGSTOP、SIGTTIN、SIGTSTP或者 SIGTTOU 信号之后进入该状态。
TASK_TRACED 表示进程被 debugger 等进程监视,进程执行被调试程序所停止。当一个进程被另外的进程所监视,每一个信号都会让进程进入该状态。
一旦一个进程要结束,先进入的是 EXIT_ZOMBIE 状态,但是这个时候它的父进程还没有使用wait() 等系统调用来获知它的终止信息,此时进程就成了僵尸进程。EXIT_DEAD 是进程的最终状态。EXIT_ZOMBIE 和 EXIT_DEAD 也可以用于 exit_state。
上面的进程状态和进程的运行、调度有关系,还有其他的一些状态,我们称为标志。放在 flags字段中,这些字段都被定义成为宏,以 PF 开头。
1 |
PF_EXITING 表示正在退出。当有这个 flag 的时候,在函数 find_alive_thread() 中,找活着的线程,遇到有这个 flag 的,就直接跳过。
PF_VCPU 表示进程运行在虚拟 CPU 上。在函数 account_system_time中,统计进程的系统运行时间,如果有这个 flag,就调用 account_guest_time,按照客户机的时间进行统计。
PF_FORKNOEXEC 表示 fork 完了,还没有 exec。在 _do_fork ()函数里面调用 copy_process(),这个时候把 flag 设置为 PF_FORKNOEXEC()。当 exec 中调用了 load_elf_binary() 的时候,又把这个 flag 去掉。
2.4 任务权限
任务权限主要包括以下两个变量,real_cred是指可以操作本任务的对象,而red是指本任务可以操作的对象。
1 | /* Objective and real subjective task credentials (COW): */ |
cred定义如下所示
1 | struct cred { |
从这里的定义可以看出,大部分是关于用户和用户所属的用户组信息。
uid和gid,注释是 real user/group id。一般情况下,谁启动的进程,就是谁的 ID。但是权限审核的时候,往往不比较这两个,也就是说不大起作用。euid和egid,注释是 effective user/group id。一看这个名字,就知道这个是起“作用”的。当这个进程要操作消息队列、共享内存、信号量等对象的时候,其实就是在比较这个用户和组是否有权限。fsuid和fsgid,也就是 filesystem user/group id。这个是对文件操作会审核的权限。
在Linux中,我们可以通过chmod u+s program命令更改更改euid和fsuid来获取权限。
除了以用户和用户组控制权限,Linux 还有另一个机制就是 capabilities。
原来控制进程的权限,要么是高权限的 root 用户,要么是一般权限的普通用户,这时候的问题是,root 用户权限太大,而普通用户权限太小。有时候一个普通用户想做一点高权限的事情,必须给他整个 root 的权限。这个太不安全了。于是,我们引入新的机制 capabilities,用位图表示权限,在capability.h可以找到定义的权限。我这里列举几个。
1 |
对于普通用户运行的进程,当有这个权限的时候,就能做这些操作;没有的时候,就不能做,这样粒度要小很多。
2.5 运行统计
运行统计从宏观来说也是一种状态变量,但是和任务状态不同,其存储的主要是运行时间相关的成员变量,具体如下所示
1 | u64 utime;//用户态消耗的CPU时间 |
2.6 进程调度
进程调度部分较为复杂,会单独拆分讲解,这里先简单罗列成员变量。
1 | //是否在运行队列上 |
2.7 信号处理
信号处理相关的数据结构如下所示
1 | /* Signal handlers: */ |
这里将信号分为三类
- 阻塞暂不处理的信号(blocked)
- 等待处理的信号(pending)
- 正在通过信号处理函数处理的信号(sighand)
信号处理函数默认使用用户态的函数栈,当然也可以开辟新的栈专门用于信号处理,这就是 sas_ss_xxx 这三个变量的作用。
2.8 内存管理
内存管理部分成员变量如下所示
1 | struct mm_struct *mm; |
由于内存部分较为复杂,会放在后面单独介绍,这里了先不做详细说明。
2.9 文件与文件系统
文件系统部分也会在后面详细说明,这里先简单列举成员变量
1 | /* Filesystem information: */ |
2.10 内核栈
内核栈相关的成员变量如下所示。为了介绍清楚其作用,我们需要从为什么需要内核栈开始逐步讨论。
1 | struct thread_info thread_info; |
当进程产生系统调用时,会利用中断陷入内核态。而内核态中也存在着各种函数的调用,因此我们需要有内核态函数栈。Linux 给每个 task 都分配了内核栈。在 32 位系统上 arch/x86/include/asm/page_32_types.h,是这样定义的:一个 PAGE_SIZE是 4K,左移一位就是乘以 2,也就是 8K。
1 |
内核栈在 64 位系统上 arch/x86/include/asm/page_64_types.h,是这样定义的:在 PAGE_SIZE 的基础上左移两位,也即 16K,并且要求起始地址必须是 8192 的整数倍。
1 |
内核栈的结构如下所示,首先是预留的8个字节,然后是存储寄存器,最后存储thread_info结构体。
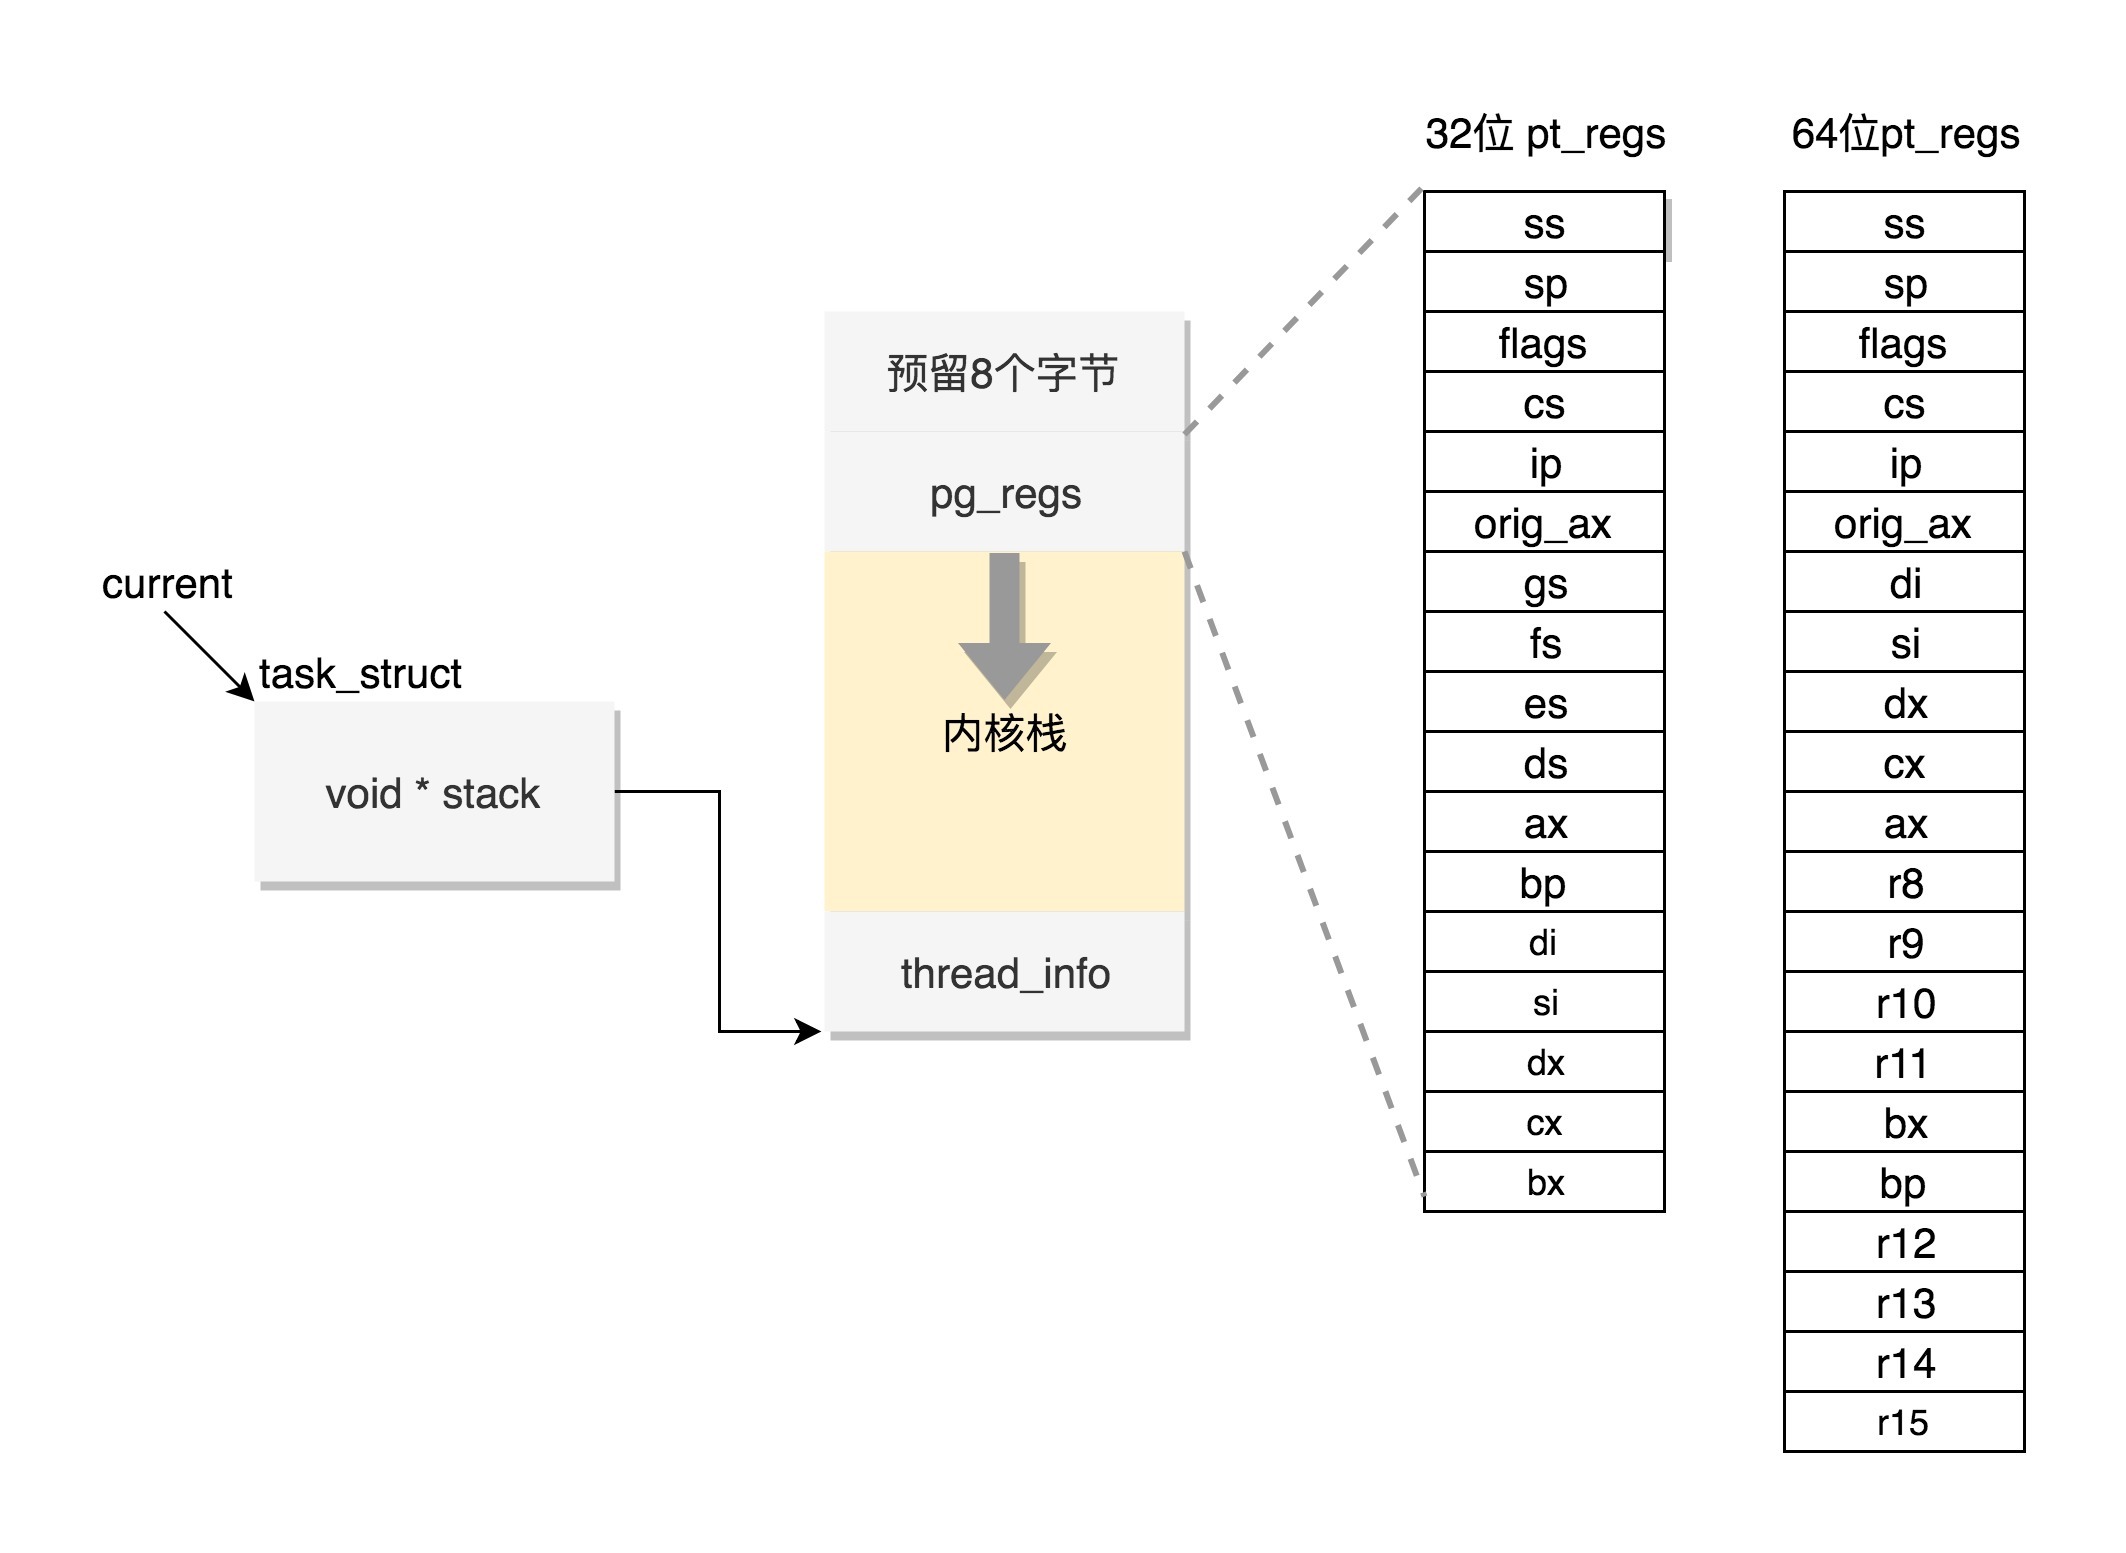
这个结构是对 task_struct 结构的补充。因为 task_struct 结构庞大但是通用,不同的体系结构就需要保存不同的东西,所以往往与体系结构有关的,都放在 thread_info 里面。在内核代码里面采用一个 union将thread_info和stack 放在一起,在 include/linux/sched.h 中定义用以表示内核栈。由代码可见,这里根据架构不同可能采用旧版的task_struct直接放在内核栈,而新版的均采用thread_info,以节约空间。
1 | union thread_union { |
另一个结构 pt_regs,定义如下。其中,32 位和 64 位的定义不一样。
1 |
|
内核栈和task_struct是可以互相查找的,而这里就需要用到task_struct中的两个内核栈相关成员变量了。
2.10.1 通过task_struct查找内核栈
如果有一个 task_struct 的 stack 指针在手,即可通过下面的函数找到这个线程内核栈:
1 | static inline void *task_stack_page(const struct task_struct *task) |
从 task_struct 如何得到相应的 pt_regs 呢?我们可以通过下面的函数,先从 task_struct找到内核栈的开始位置。然后这个位置加上 THREAD_SIZE 就到了最后的位置,然后转换为 struct pt_regs,再减一,就相当于减少了一个 pt_regs 的位置,就到了这个结构的首地址。
1 | /* |
这里面有一个TOP_OF_KERNEL_STACK_PADDING,这个的定义如下:
1 |
也就是说,32 位机器上是 8,其他是 0。这是为什么呢?因为压栈 pt_regs 有两种情况。我们知道,CPU 用 ring 来区分权限,从而 Linux 可以区分内核态和用户态。因此,第一种情况,我们拿涉及从用户态到内核态的变化的系统调用来说。因为涉及权限的改变,会压栈保存 SS、ESP 寄存器的,这两个寄存器共占用 8 个 byte。另一种情况是,不涉及权限的变化,就不会压栈这 8 个 byte。这样就会使得两种情况不兼容。如果没有压栈还访问,就会报错,所以还不如预留在这里,保证安全。在 64 位上,修改了这个问题,变成了定长的。
2.10.2 通过内核栈找task_struct
首先来看看thread_info的定义吧。下面所示为早期版本的thread_info和新版本thread_info的源码
1 | struct thread_info { |
老版中采取current_thread_info()->task 来获取task_struct。thread_info 的位置就是内核栈的最高位置,减去 THREAD_SIZE,就到了 thread_info 的起始地址。
1 | static inline struct thread_info *current_thread_info(void) |
而新版本则采用了另一种current_thread_info
1 |
那 current 又是什么呢?在 arch/x86/include/asm/current.h 中定义了。
1 | struct task_struct; |
新的机制里面,每个 CPU 运行的 task_struct 不通过thread_info 获取了,而是直接放在 Per CPU 变量里面了。多核情况下,CPU 是同时运行的,但是它们共同使用其他的硬件资源的时候,我们需要解决多个 CPU 之间的同步问题。Per CPU 变量是内核中一种重要的同步机制。顾名思义,Per CPU 变量就是为每个 CPU 构造一个变量的副本,这样多个 CPU 各自操作自己的副本,互不干涉。比如,当前进程的变量 current_task 就被声明为 Per CPU 变量。要使用 Per CPU 变量,首先要声明这个变量,在 arch/x86/include/asm/current.h 中有:
1 | DECLARE_PER_CPU(struct task_struct *, current_task); |
然后是定义这个变量,在 arch/x86/kernel/cpu/common.c 中有:
1 | DEFINE_PER_CPU(struct task_struct *, current_task) = &init_task; |
也就是说,系统刚刚初始化的时候,current_task 都指向init_task。当某个 CPU 上的进程进行切换的时候,current_task 被修改为将要切换到的目标进程。例如,进程切换函数__switch_to 就会改变 current_task。
1 | __visible __notrace_funcgraph struct task_struct * |
当要获取当前的运行中的 task_struct 的时候,就需要调用 this_cpu_read_stable 进行读取。
1 |
通过这种方式,即可轻松的获得task_struct的地址。
三. 总结
本文大体介绍了task_struct的整体结构,对于很多涉及到复杂模块的部分并未展开讲解,在后文中会一一叙述。
相关源码
[1] task_struct
参考文献
[1] Linux-insides
[2] 深入理解Linux内核
[3] Linux内核设计的艺术
[4] 极客时间 趣谈Linux操作系统